Terrain Generation and Editing using Marching Cubes
According to wikipedia, Marching Cubes is an algorithm for creating a polygonal mesh out of a discrete 3d scalar field.
So let's see how the algorithm1 works, then we will create a terrain and finally edit it. All the rendering is done using Three.js2 library.
The Algorithm
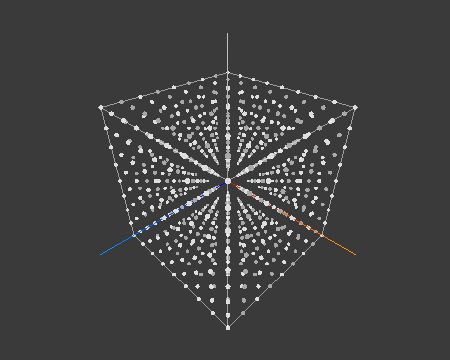
Step 1: Fill a 3d space with random values at discrete intervals
In a 3d space where we want to draw our mesh, we will sample the points i.e assign some random value to each point at discrete intervals.
where, range of values can arbitrary.
Step 2: Choose a surface level
Now we have to define a surface level i.e any value between min and max of the whole field. A point with value above surface level is considered inside the mesh and below the surface level is considered outside the mesh.
In the above diagram I have generated values between [-10, 10] and considered surface level as 0. Points above surface level are colored white and points below surface level are colored black.
Note: Above and below surface level is subjective and does not affect the algorithm in any way. We just want to draw the boundary of the mesh. Mesh will be just inverted.
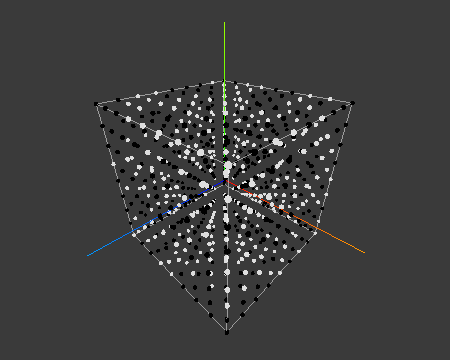
Step 3: Draw Mesh Triangles
Now for each point we consider next nearest seven points,
thus forming a cube. Based on which points are included in mesh i.e below surface level we draw a mesh. For example: Lets take a look at the below image.
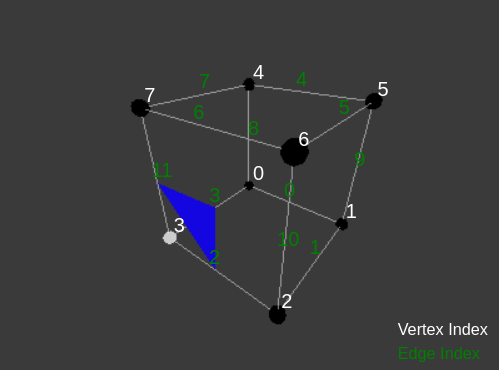
The vertex number 3 is above surface level so we will draw a mesh facet that will cut edge 2-3-11. Now if we manually code all the 28 combinations it would be little difficult. Thus we use edge tables and triangulation tables to make this process easier.
- Calculate the
cubeIndexwhich will give a 12bit number in edge table where each bit corresponds to an edge.
function getCubeIndex() {
  let cubeIndex = 0;
  if (grid.val[0] > isoLevel) cubeIndex |= 1;
  if (grid.val[1] > isoLevel) cubeIndex |= 2;
  if (grid.val[2] > isoLevel) cubeIndex |= 4;
  if (grid.val[3] > isoLevel) cubeIndex |= 8;
  if (grid.val[4] > isoLevel) cubeIndex |= 16;
  if (grid.val[5] > isoLevel) cubeIndex |= 32;
  if (grid.val[6] > isoLevel) cubeIndex |= 64;
  if (grid.val[7] > isoLevel) cubeIndex |= 128;

  return cubeIndex;
}

let edgeIndex = edgeTable[cubeIndex];
In the above example when just vertex 3 is above surface level, we get cubeIndex is 8. Correspondingly the edgeTable[8] gives:
{3, 11, 2, -1, -1, -1, -1, -1, -1, -1, -1, -1, -1, -1, -1, -1}
- Now we know which edges to connect, but we also need to get a point on each edge and connect them to make a triangular mesh. Either we can take the mid point of the edge or take a weighted distance between the two vertices of the edge.
where,
V1 = Value of vertex 1
V2 = Value of Vertex 2
P1 = position of Vertex 1
P2 = position of Vertex 2
You can play with the interactive demo below and check out how the mesh is drawn in each combination. You can click a corner of cube to make the point active or inactive.
Btw if you really check there are just 15 unique combinations3 possible.
Step 4: Iterate over whole field and draw
Now we just need to iterate over the whole field and apply the step 3. You can play with the interactive demo below. Try changing the surface level and field type.
For spherical field, I have just assigned the field values using the sphere distance function.
getFieldValue(x, y, z, type) {
  if (type === "Random") {
    return MathUtil.randomInt(-this.range, this.range);
  } else {
    // type === "Sphere"
    return this.radius * this.radius - (x * x + y * y + z * z);
  }
}
Creating A Procedural Terrain
As you have realized, you can generate any shape as long as you have the field function figured out. So for terrain we will use a noise function - Simplex Noise. It is just like Perlin Noise but with fewer directional artifacts and lower computation overhead. You can read wikipedia in more detail on how to generate it.
It is often used in procedural generation because the randomness vary very smoothly but still gives a natural looking feel.
// constants which affect the shape of generated terrain
const numOctaves = 4;
const lacunarity = 2;
const persistence = 0.5;
const noiseWeight = 7;
const weightMultiplier = 3.6;

getFieldValue(x, y, z) {
    let noise = 0;

    let frequency = 0.02;
    let amplitude = 1;
    let weight = 1;
    for (var j = 0; j < numOctaves; j++) {
        let n = this.simplex.noise3D(
            x * frequency, y * frequency, z * frequency,
        );
        let v = 1 - Math.abs(n);
        v = v * v * weight;
        weight = Math.max(Math.min(v * weightMultiplier, 1), 0);
        noise += v * amplitude;
        amplitude *= persistence;
        frequency *= lacunarity;
    }

    let finalVal = -y + noise * noiseWeight;

    return -finalVal;
}
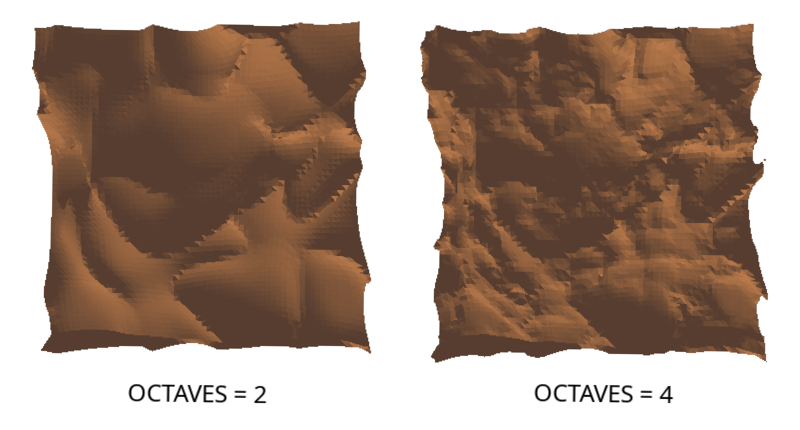
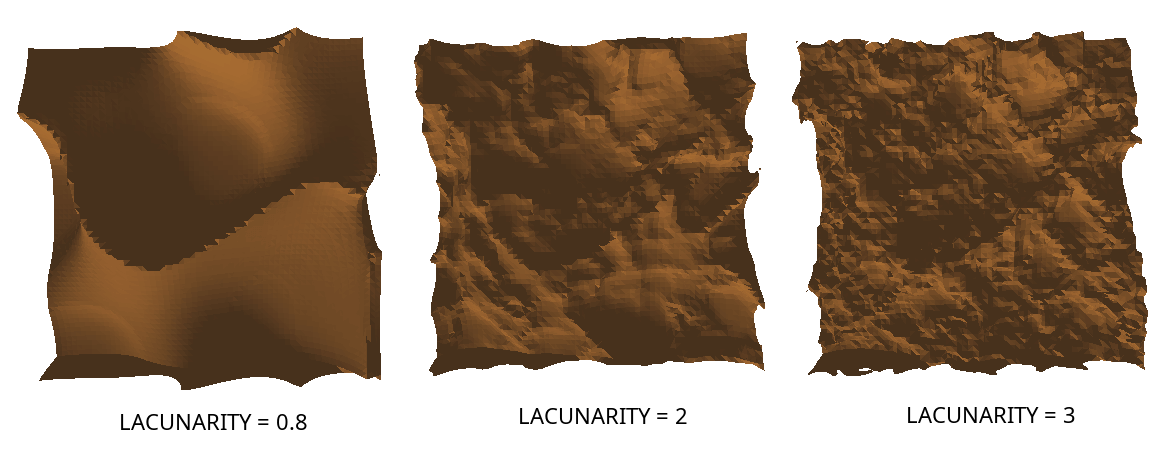
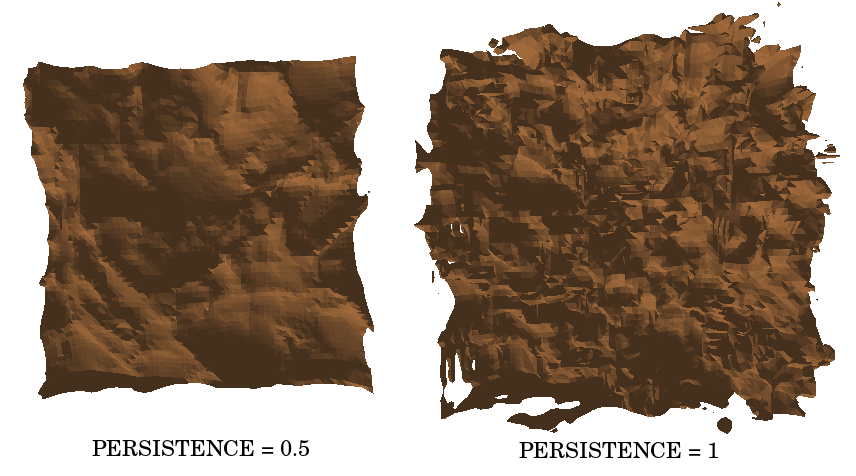
Lets see how these values affect the generated terrain.
- NumOctaves: Each octave run adds layer of details to the surface. So more the number of octaves more detailed terrain you have.
- Lacunarity: It determines how much detail is added or removed at each octave. Lacunarity of more than 1 means each octave will increase its level of detail, 1 means it will stay same & less than 1 means it will decrease. We don't want last two, so a number greater than 1 works quite well.
- Persistence: It determines how much each octave contributes to the overall shape. A Persistence of 1 means each octave contribute equally, more than 1 means successive octave contribute more and less than 1 means successive octaves contribute less. We usually want to keep it less than 1 else output will be just noise.
Other factors just helps in increasing or decreasing the noise amplitude. You can play around in the above terrain interactive with these values.
Editing the Generated Terrain
Once you have a terrain setup, to edit we just have to manipulate the field values. Consider we have a brush size of radius r, we just need to manipulate the spherical field around the position on terrain which we want to edit. It is same as creating a spherical mesh, we can just put distance from center as field value.
/**
 * @brushSize float: Radius of brush
 * @point Vector3: Position on terrain
 * @multiplier int: +1 for raising the terrain and -1 for depress
 */
makeShape(brushSize, point, multiplier) {
  for (let x = -brushSize; x <= brushSize; x++) {
      for (let y = -brushSize; y <= brushSize; y++) {
          for (let z = -brushSize; z <= brushSize; z++) {
              let distance = this.sphereDistance(point.clone(), new THREE.Vector3(point.x + x, point.y + y, point.z + z), brushSize);
              if (distance < 0) {
                  let xi = Math.round(point.x + x);
                  let yi = Math.round(point.y + y);
                  let zi = Math.round(point.z + z);

                  this.field.set(xi, yi, zi, this.field.get(xi, yi, zi) + distance * multiplier);
              }
          }
      }
  }
}

sphereDistance = (spherePos, point, radius) => {
  return spherePos.distanceTo(point) - radius;
}
Final Notes
You can find the full source code on my github. If you enjoyed the article and want to see more of them then please subscribe below.